
Build Webapp In R Using Shiny
How to build shiny app from scratch in R?
You can build web page (online reporting tool) without knowing any web programming languages such as Javascript / PHP / CSS.
The best part about shiny package is that you can easily integrate R with webpage.
Suppose you want your web page run machine learning algorithms like random forest, SVM etc and display summary of the model with the flexibility of selecting inputs from user.
Shiny can do it?
Shiny’s prominent features
- Customizable widgets like sliders, drop down lists, numeric inputs and many more.
- Downloading datasets, graphs and tables in various formats.
- Uploading files.
- Provides utility to create brilliant plots.
- In-built functions for viewing data or printing the text or summaries.
- Reactive programs which makes data handling easier.
- Conditional Panels for only when a particular condition is present.
- Works in any R environment (Console R, RGUI for Windows or Mac, RStudio, etc)
- No need to learn another software for online dashboarding
- Can style your app with CSS / HTML (Optional)
Two must things in shiny 1. UI: user interface which is controlled by ui script 2. Sever: It contains the instructions that your computer needs when the user interacts with the app
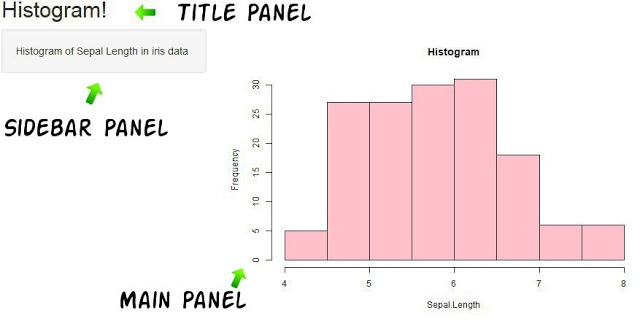
Basic layout of UI
User Interface: A simple shiny UI consists of a fluidpage which contains various panels. We can divide the display in two parts named sidebdarPanel( ) and mainPanel( ). Both of the panels can be accessed using sidebarLayout( ).
- Title panel is a place where the title of the app is displayed.
- Sidebar panel is where special instructions or widgets (drop down / slider/ checkbox) are displayed to the app user. The sidebar panel appears on the left side of your app by default. You can move it to the right side by changing the position argument in the sidebar layout.
- Main panel is the area where all the outputs are generally placed.
The first simple shiny app with basic layout
library(shiny)
ui = fluidPage(sidebarLayout(sidebarPanel("Welcome to Shiny App"),
                             mainPanel("This is main Panel")))
server = function(input, output) {  }
shinyApp(ui, server)
Guidelines for beginners to run a shiny app
Step 1 : shinyApp(ui,server) : It is an in-built function in shiny package to run the app with ui and server as the arguments. Select the code and run it. Once you do it successfully, you would find the text **Listening on http://127.0.0.1:4692** on console.
Step 2 : To create your app you need to save the code as an app.R file and a RunApp icon will get displayed on your screen. Click on it and a new prompt window as your app will appear.
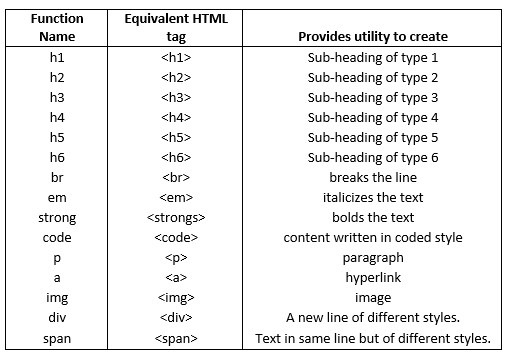
Using HTML tags in Shiny
Content can be added in various panels. To change the appearance of the text by bolds, italics, images, changing the fonts and colors, adding heading etc. we can use various HTML functions in shiny. Some of them being the same in both of them are:
Creating a hyperlink
A hyperlink can be created using a( ) where the first argument is the text with which the link is attached. href contains the link for our website which we want to attach.
Modifying the text presentation using HTML tags.
We create an app containing the list of the favorite novels . You can refer to the above mentioned table of HTML and shiny functions.

Introducing widgets
Various widgets are used in shiny to select various outputs. These widgets can be inserted in the ui function (anywhere in the main panel and sidebar panel).
The most commonly used widgets are:


- ‘Buttons’ can be created using an actionButton and submitButton widgets
- Single check box, multiple check box and date inputs are created using checkboxInput, checkboxGroupInput and dateInput respectively.
- Date range is created using dateRangeInput.
More detail see: Most commonly used widgets
Deploying shiny app on shinyapps.io
First you need to have an account on shinyapps.io.
Import library rsconnect by using
library(rsconnect)
Then you need to configure the rsconnect package to your account using the code below -
rsconnect::setAccountInfo(name="<ACCOUNT>", token="<TOKEN>", secret="<SECRET>")
To deploy the app you can write:
rsconnect::deployApp(' Folder path in which your app.R file is saved')
As a result a new web page of your app link will be opened.
